Sunday, October 11, 2009

HeliCommand, PC SOFTWARE FOR RC PLANES


NOVICE PILOTS WILL BE ABLE TO HOVER MUCH MORE QUICKLY AS THEY CAN CONCENTRATE ON THE PROPER INPUTS WITHOUT FEARING A CRASH
The main unit (right) contains the gyros and optical sensors. The helicopter's cyclic servos are plugged into the RC module (left).

One of the barriers to enjoying RC helicopters is the lengthy learning curve and the associated crashes. Perhaps you've tried a heli in the past, became frustrated, and then put it away in the closet. The HeliCommand, distributed by MS Composit, is an autopilot that allows the beginner to learn how to hover and fly safely without the fear of accidents. The unit easily installs on most helicopters from 450-size electrics to large nitro and scale helis and also works with most transmitters. It weighs only 33 grams and includes an internal high-quality, heading-hold gyro.
The HeliCommand is unique in that it uses an optical sensor and triple-axis gyros for stabilization. In the "position" mode, the autopilot uses the optical sensor and gyros to hold the heli horizontally and in a fixed geographical position. This is ideal for learning how to hover and slow circuits. The unit will actively brake the heli if it is moving. Stick movements will override the autopilot and, if you let go of them, it will return to a stable hover. In the "horizontal" mode, the optical sensor is not used and the unit stabilizes the heli in the horizontal attitude. This is very useful if the ground surface does not have good optical quality, for low-light situations and indoors. It is also helpful for scale helis as it can be hidden inside the fuselage. If your radio system has a spare channel, you can switch remotely between the position, horizontal or off modes. When used with a proportional slider or knob, you can also adjust the autopilot gain or degree of stabilization. In all cases, the pilot must still manually control the collective pitch and tail rotor.
There are four versions of the HeliCommand: 3A, 3D, Rigid and Profi. The 3A is ideal for beginners, while the 3D version that's reviewed here adds attitude stabilization for inverted flying. The Rigid is for flybarless heads and the Profi is designed for optimal stabilization for professional aerial photographers and surveyors. An optional PC adapter and software is available and makes setup a lot easier. It also enables you to access supplementary settings for stabilization and tail-rotor gyro. If you intend to get into aerobatics, I recommend the 3D version because it can be used to expand your flight skills beyond hovering.
SPEC CHECK

  • MANUFACTURER: Captron (helicommand.com)
  • DISTRIBUTOR: MS Composit (mscompositusa.com)
  • DIMENSIONS 55*35*22.5mm
  • WEIGHT: 33 grams (w/ cables)
  • OPERATING VOLTAGE: 4.6 to 6 volts
  • PRICE: $599 (3D version); $65 for PC adapter and software
INSTALLATION
I mounted the autopilot under the radio tray in the Kinetic. It needs to be isolated from vibration.

The Module is mounted to the side of the receiver. The servos are plugged into it and the Module is plugged into the main unit and receiver.

The optional PC software and adapter makes programming the HeliCommand a snap.

I chose the Heli-Max Kinetic 50 (greatplanes.com) as the testbed for the HeliCommand as it is a great flying model that can be used for hover, forward flight and aerobatics training, as well as 3D. I upgraded it with a Futaba R6014FS 14-channel receiver and used a Futaba 10CH transmitter (futaba-rc.com) on 2.4GHz. The instructions mention that the HeliCommand contains an internal failsafe when using PPM/FM.
The autopilot set contents include the HeliCommand main unit, RC module, mounting bracket, double-sided mounting tape, cable ties and instructions. The instructions are very good and explain how the unit works and also feature detailed installation instructions and diagrams. If a nitro engine is used, the main unit must be isolated from engine vibration and also have a clear field of vision directly below the optical sensor. A tail-boom mounting bracket is included, but for several reasons, I chose to mount it to the front of the heli, underneath the radio tray. First, the tail-boom support struts intrude on the sensor's field of vision, and secondly, it will be protected from the exhaust.
I used CA to glue the pieces together and fabricated a mounting bracket out of ?-inch plywood and triangular balsa stock. After giving it a quick coat of Rustoleum paint to prevent any oil from the exhaust seeping in, I used double-sided tape and cable ties to secure it to the radio tray. Next, I used sticky-back Velcro to secure the unit to the mount, and added a Velcro strap as a safety measure. I then connected the aileron, elevator, and rudder servos to the RC module, and used Velcro to attach it to the side of the receiver. The cables from the RC unit were then inserted into the receiver's proper receptacle, and the main cable was connected to the main unit. As I'll be using the HeliCommand's internal gyro, I removed the existing gyro. I also cut a window into the bottom of the canopy so that the optical sensor would be unobstructed.
Although most modern radios contain mixing for various swashplate modes, these are not used as the HeliCommand contains its own mixing. This means that if your heli uses a form of eCCPM, the radio should still be set for standard mechanical mixing. After the unit is installed and all the servos are plugged-in, the setup can begin. The main unit has an LED that is used for setting up and the unit's status. First, the unit must be calibrated for the transmitter neutral points and to learn the stick direction. This is done by a series of stick movements when in the setup mode. From here, you can use the computer interface and software to set the servo directions and to tell the unit the main rotor rotation direction and orientation. If you don't have the software, you can do it manually by using the transmitter, but the computer makes it much easier. It also has additional settings for fine-tuning and advanced flight.
After you complete the setup, make sure all the servos and gyro are operating in the correct direction. Test the autopilot by rotating the heli in various directions and check if the swashplate responds properly. It should counteract any roll or pitch and the autopilot should try to level the swashplate. I put the gain on a proportional lever on the transmitter's side. Move the lever to see if the unit goes into the proper mode (position, horizontal, or off) as indicated by the LED.
IF YOU'RE TRYING A NEW MANEUVER AND BECOME DISORIENTATED, TURN THE UNIT ON AND IT WILL RETURN TO A HORIZONTAL ATTITUDE. THE PEACE OF MIND OFFERED BY THE HELICOMMAND IS PRICELESS.
While the price of the HeliCommand might seem high, it is a sophisticated piece of equipment that utilizes innovative technology. It's not a substitute for an experienced instructor, but it does give the beginner increased confidence so he can concentrate on learning rather than constantly worrying about crashing. As your skill increases, you can use the HeliCommand as a "safety switch." If you're trying a new maneuver and become disorientated, turn the unit on and it will return to a horizontal attitude. The peace of mind offered by the HeliCommand is priceless.
FLIGHT TEST
The day of the flight testing was sunny; good conditions for the optical sensor in the HeliCommand unit. As the mixing normally done by the radio is done by the HeliCommand, I first flew the Kinetic with the stabilization turned off (the mixing is still done by the autopilot). The heli responded normally and felt the same as before the unit was installed. Now it was time to test it in a hover. I set the autopilot's maximum gain at 75 percent, with the transmitter's slider lever fully on. The instructions recommend that the helicopter be in a hover at a safe height before engaging the autopilot for the first time. I brought the heli in a hover and moved the gain lever to full in the position mode. This mode uses the sensor to keep the heli's position and I was happy to see the heli hovering by itself. I let go of the sticks and it remained in a steady hover, drifting slightly. It was easy to bring it back in position and I only needed to move the sticks a little more when I wanted to maneuver. By decreasing the gain, less stick movement was needed, but the model drifted a bit more. When I tried the horizontal mode (optical sensor not used), I found the heli reacted much the same as in the position mode, but had more drift.
To give the HeliCommand a realistic test, I gave aggressive cyclic commands similar to a beginner overcontrolling. As soon as I let go of the sticks, the model resumed a steady hover. I then tried some slow forward flight. In the position mode, the HeliCommand tries to stop the model and more cyclic stick movement is required. This is much less pronounced when using the horizontal mode. In a turn, the cyclic must be held in or the model will try to go back to level flight. For aggressive aerobatics, the HeliCommand must be turned off, but you can switch it on and greatly increase your chance of recovery.
The HeliCommand is a great tool for beginners and sport flyers seeking to expand their flight envelope. Novice pilots will be able to hover much more quickly as they can concentrate on the proper inputs without fearing a crash. Intermediate pilots will find they will also progress more rapidly knowing they have a "safety" switch in case things go awry.::

Friday, September 18, 2009

HOW A MODEL JET ENGINE OPERATES


A true model jet engine adds the ultimate touch of realism to an rc jet, and commercially produced units for radio control use are now widely available.

Turbine rc jet flying has become a big thing in recent years and there are some spectacular models around, but this aspect of the hobby is not for the novice! Endless hours of flying experience and an impressive budget are needed to actively participate in flying models with real gas turbines.

Even the smaller model jet engines can cost upwards of a thousand dollars - and that's on top of the cost of the jet itself, radio gear and all the other bits needed. So it's serious business indeed, but ultimately has to be one of the most rewarding ways of enjoying rc flying... if you can afford it!

Model gas turbines are also used in larger scale helicopters, but from a personal point of view I don't find these too realistic because of the sound - rc helicopters running on a turbine sound more like jets than helicopters (again, just a personal opinion!).

A JetCat model jet engineShown right is a JetCat model turbine, one of the more popular commercially produced model jet engines readily available. JetCat USA are at the forefront of this remarkable technology and offer some excellent turbine units.
Pre model jet engines, rc jets have always lacked the authenticity of having a true gas turbine until recent years; previously jets needed to be powered by either gas or electric motors with a propeller (thus spoiling the look of the aircraft) or noisy ducted fan and 'pulse jets' (which are more rocket motors than anything else). But now they can be powered by a fully functional and realistic looking jet turbine, thanks to manufacturers like JetCat!

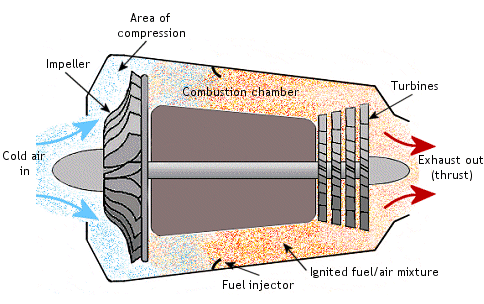
A model jet engine design can vary from one manufacturer to another, but they all work on the same basic principle. The most common type nowadays is the centrifugal flow turbine, as opposed to the lengthier axial flow turbine.

The big difference between centrifugal and axial flow turbines is in the stage of compression. In a centrifugal flow unit, air entering the turbine is thrown outwards as it passes over the spinning impeller. The air hits against the inside of the can and so is compressed greatly before passing into the combustion chamber. This intense compression increases the pressure and hence temperature of the air, making it more effective when it mixes with the fuel.

The fuel, which is nearly always kerosene ('Jet A1'), is introduced into the combustion chamber as a very fine mist, and so mixes easily with the now highly compressed air. This fuel/air mixture is then ignited by a small glow plug, much the same as the one found on a 2 or 4 stroke model airplane engine.

As the fuel/air mixture ignites and explodes within the chamber, the coned shape of the chamber forces it rearwards towards the turbines. The turbines accelerate the velocity of the passing gases and increase the pressure of them too. The gases (exhaust) finally get squeezed through the narrowing jet pipe at the very rear of the engine, exiting at great speed and pressure, thus generating the high levels of thrust.
The turbines are connected to the front impeller by way of a main shaft, so that they power the impeller as they spin.

The drawing below shows the basic principle of a centrifugal flow model jet engine:

Basic principle of a model jet engine

Model jet engines need to be started with compressed air to initially power-up the turbine. This can be supplied from a diver's oxygen tank or a similar source. Only when the compressor has reached the necessary revolutions per minute (RPM) can the fuel be introduced into the chamber and the engine operate normally.

Saturday, July 11, 2009

Introduction to Brushless Motor Activator

Main Parameters:


Type
WK-WST-60A
WK-WST-40A
WK-WST-30A
WK-WST-20A
Staining voltage 6-25V
6-17V
6-17V
6-17V
BEC current 3.0A 3.0A 3.0A 3.0A
continuous output current 60A 40A 30A 20A
Instant max current 80A 60A 50A 40A
Inside impedance 0.0022 O 0.0033 O 0.0044 O 0.0066 O
Reversion Yes Yes Yes Yes
Low voltage, cut electricity protection Yes Yes Yes Yes
Weight 35g (approximately) 33g (approximately) 32.4g (approximately) 31.8g (approximately)


When the controller signal lose, it will stop automatically. But it will come back to the former mode at once when it receives the signals. It can be used for electric planes, helicopters. And it can be positive and reverse by adjting the motor lines.

Introduction in ing:

1.please insert the signal lines in correct direction to the controlling output port of the controller.

2.please connect well the three output ports of the activator suitably to the three input ports of the Brushless motor.

3.please add the relevant voltage to the electricity input port of the activator(please be sure the positive and negative poles are right),and you can hear a sound beep¡±.When you ph the throttle rod, the motor will turn at once. If the motor turning the reversing direction, you can exchange any two of the three lines and it will be OK.

WARNING: If the ing current of the BEC over the rating, we advise you e extra BEC. Or it will damage the activator.

Do as the sketch map:


Trouble diaganosing:


Phenomena
Reasons
Resolution
The motor don't turn after connecting electricity 1.There is something wrong with the plug of the electricity
2.The battery's voltage is too low, circuit protection
3.Transmitter rod isn't in the lowest position, circuit protection
1.Reinserting the plug of the electricity or changing a new one
2.Charge the battery fully.
3.Ph the transmitter rod to the lowest position.
Motor running reversed
1.Connection the three output ports not correctly to the suitable three input ports of the Brushless motor. 1.Exchanging the two of the three lines and it will be OK.
Stopping in midway
1.The battery voltage is too low, circuit protection.
2.There is something wrong with the pin, cutting electricity.
3.The output ports and motor not connect well.
4.Receiving signals break off.
1.Charge the battery fully.
2.Reinsert the plug of the electricity or change a new one.
3.Check the transmitting and receiving; repair the signals to communicate normally.
Hear a "beep" sound but the motor not running 1.Transmitter rod is not in the lowest position, circuit protection.
2.The output ports not connecting well with the motor.
1.Ph the transmitter rod to the lowest position.
2.Reinsert the plug of the electricity or change a new one.

Saturday, July 4, 2009

Duratrax Nitro Evader St

Looking for Duratrax Nitro Evader St? Click here for more information.

At 1/10th scale, the Duratrax Nitro Evader ST has all the makings of a great beginner truck. Duratrax really knows how to take care of their drivers, because when you get the Evader, you've already got everything you need to get running. There's nothing worse then getting a new RC vehicle, and you're sitting there for two or more hours trying to figure out how to get the darn machine operational! It comes with a video on how to get started, so for those of you who are bad with instructions, just watch and learn. Here we're going to outline some of the pro and cons for the vehicle, as well as show you pictures and videos of it racing around in action!

duratrax nitro evader st

Features Of The Duratrax Nitro Evader ST

Pros

  • Comes with a DTX .18 pull-start engine and 75cc fuel tank. All of which is secured right into the ultra tough chassis made of 3mm thick anodized aluminum. Durable and powerful - so powerful that it wouldn't be allowed in official races by ROAR standards! This thing is fast.
  • Comes stock with Pro-Line tires, which are amazing for off-road racing - right out of the box!
  • Stock servos is just powerful enough to manage steering, breaking, etc.
  • Comes with a three-gear sealed transmission, making it optimal for racing.
  • Shocks are more than average, making it handle bumpy terrain like its nobody's business.
  • Comes with a 12 month Stress-Tech guarantee from Duratrax, so if you break something, you'll be taken care of. It also comes with a 3 year engine warranty - definitely great for a first time buyer.
  • Very lightweight, weighing in at 4.3 pounds.

Cons

  • Break-in methods in the instructions used to ask you to run the engine too lean. Newer instructions may have fixed this issue.
  • Replace the stock servo with something more powerful, like the Futaba S3003.
  • Like the Duratrax Nitro Evader BX buggy, the fuel tank is also too small. Upgrading your fuel tank to a RC10GT tank from Team Associated is recommended.

duratrax nitro evader st jump

Rating/Recommendations

Wow, a great overall 2WD stadium truck. For a newcomer, you can't go wrong with Duratrax because of the great warranty support they offer - not to mention how easy their vehicles are to handle. The Evader ST receives a 4.1/5. with some slight upgrades, it will be the best and fastest on the block!

Sunday, June 7, 2009

BUKU Self-Tuning Exhaust System Review

In the RC world, one of the things that we think about most is getting the absolute best power from our vehicles that we can. One element that is crucial to having the best power possible from your vehicle is a well matched exhaust system that can complement the power of your motor. Alot of times, you can have the best motor out there, but if you haven't paired it with a good exhaust, you can kiss all the horsepower and abilities of your motor goodbye. On the flip side, if you have a old motor, or a motor that does not create alot of power, you can wake it up or give it a good kick in the rear by adding a great exhaust. The question is, which one? This is where the Buku comes in.

Direct quote from Dave, the owner of Buku Performance Products:

Buku Performance Products was conceived from a passion for technological innovation. We are focused on developing products which are truly innovative and that help the R/C enthusiast to obtain the highest levels of performance. We believe that innovative thinking and objective testing are the foundations for the finest R/C products. Every product we develop is the result of thorough research and engineering, followed up with the most exhaustive real world testing. Our devotion to fundamental research and objective evaluation ensures that out products will not only be unique in design and function but also truly superior in performance.

After I had tried several exhausts on my Savage X 4.6, I was ready to find an exhaust that really worked. I was getting tired of false claims of increased power, when mostly every exhaust I had tried only made the truck look good, and perform worse. After doing some hard research, I gave Buku a call. When Dave answered the phone, I was astounded at how professional and educated he was on the product. After having a good long talk with Dave, I was sure that I had found my exhaust. Dave was able to give me a in depth explanation of the exhaust and how it functions, and also seemed very down to Earth, like he was sure about his product and was not just trying to sell me something to put money in his own pocket. At the end of our conversation, I felt confident in my decision to give the Buku a shot, and couldn't have been more anxious to test it out.

BukuTwo days later, my exhaust came in the mail. I was very happy with the packaging and presentation of the exhaust. The exhaust is sent in a small cardboard box, with the exhaust itself protected very well by foam, and all the extra parts and gadgets in their own small section of the box, also well protected by foam inserts. Included with the exhaust are a very sturdy mounting wire, a tuning plug, several zip-ties, a larger convergent cone, an extra ring (both explained later), a very detailed and comprehensive instruction booklet, a light, medium, and hard stiffness tuning springs, and a tuning and adjustment wrench. Don't forget, there are also plenty of stickers included to deck out your ride and pit area. After reading every bit of the instructions, I was very confident and was sure about the processes I needed to take to make sure I got the very best performance out of my Buku exhaust.

The mounting process for the exhaust is a breeze, and you can use virtually any header design with the exhaust. Not only are there plenty of holes for spring coupling type headers, but the exhaust is also compatible with regular rubber coupler systems. The best of both worlds! The included mounting wire is hard to work with, partially due to the fact that it is very thick. I recommend using two pairs of pliers to make your bends. Although it is thick and hard to bend, it only insures that the exhaust will be mounted sturdy and strong.
Buku

Before you start your vehicle up with your newly installed Buku exhaust, you may want to become familiar with the exhaust and how it works by dis-assembling it. Whats that you say? You have already installed it on the truck? No worries! Using the large end of the included tuning and adjustment wrench, you can easily un-screw the end of the Buku, and all the components will easily come right out, in this order: End cap, tuning spring, convergent cone, and there is a small ring inside that you may need to pull out, which can easily be done with one finger. In a nutshell, here is how the exhaust works.

While at idle, the spring tension holds the Tuned Assembly at the shortest tuned length. By remaining at the shortest tuned length, the total volume of the pipe is effectively reduced allowing full exhaust pressure and maximum fuel flow to be achieved very quickly. This results in improved throttle response. When the throttle is opened, the Tuned Assembly will move almost instantly to the full tuned length, dramatically improving low-end torque and mid-range power. The power increase is likely to be more than 10% over a well designed mid-range pipe and more than 20% over a high-speed pipe.
The Tuned Assembly will remain at this full length until the motor reaches the point where the extended tuned length is no longer beneficial. It is this point where a fixed low-RPM torque pipe will fall flat and fail to deliver any further performance. The Buku Power Exhaust System, however, will automatically respond to this condition by reducing the tuned length to a point that optimizes performance. Ultimately, the Tuned Assembly will return fully to the shortest tuned length throughout the acceleration and remain there until the engine RPM is reduced. This automatic adjustment of the tuned length will happen continuously during operation and even through gearshifts, always adjusting to produce maximum power.

Those paragraphs alone almost explain exactly how the internal components work. It is recommended to use the lighter spring tensions with less powerful motors, and the heavier ones with more powerful motors for the optimum all around performance. Although, this brings up one of the great things of the Buku, you can tune it! If you have an extremely powerful motor, but are running in an area where space is tight, and you are most of the time not at full throttle for long periods of time, you can use a light spring to give you even better low-end torque, or put in both of the rings to give you a punchier throttle. Granted, you will loose top-end performance by doing this, but since your not using it anyways, it doesn't matter. The thing is, when you go to an area where you do have the option to be at high speeds frequently, you don't need another exhaust! Just a quick swap of your components in your exhaust, and it is like you have a completely different motor!

Back to running your vehicle. You have your exhaust installed correctly on your vehicle, and have read all the instructions. Insert your tuning plug into the stinger closets to the header of the exhaust, gently sliding it in, and rotating it until you feel it slide in between the coils of the spring. Once it is completely in, lock it onto the exhaust using the hanger attached to the plug. Once you have made sure it is snug, you are almost ready to start your motor. At this point, your exhaust should be looking exactly like this. (Except mounted to your vehicle). BukuOnce you have completed these steps, I recommend setting your motor back to the factory needle settings. Since the Buku is so different and makes such a difference in power, you will need to completely re-tune your motor. Don't worry, the Buku makes tuning the motor very easy. It will seem slow and sluggish when you turn it on, but this is regular for any motor running at stock settings. Let your motor get warm, and your ready to tune. Follow what is stated in the included instructions, tuning for high speed first, then tuning for your low end. It should become extremely noticeable once you have tuned your high end needle, you should see a very drastic difference in your performance. Top speed should be increased greatly, also should your you acceleration from about halfway through the RPM band up. Once you have tuned your low end, be prepared to learn how to drive you RC again. The power increase should be very evident, and if you are anything like me, you will be giggling like a little girl and smiling at the sight of your car performing up to twice as well as it did before.

Now, your pretty psyched arent you? Guess what, you can squeeze out even more power by fine tuning your exhaust. Don't worry, it isn't complicated at all, and it is very easy to get your exhaust back to stock settings if you mess up. On the end cap of the exhaust, there is a larger "nut" that unscrews the end cap which you used earlier, and then there is a tuning nut. Adjusting this nut either stiffens or loosens the spring inside of the exhaust. The stock setting for this nut is turned completely clockwise until it stops, which anyone can remember easily. Turning the screw Counter Clockwise will give you better acceleration, most of the time only loosing minimal to none top end performance. I quickly learned that if you go too much on the tuning screw, you will eventually get to a point where you loose performance, but if you are patient and do it by small increments, you can squeeze even more performance out of the exhaust. Tuning with the springs, rings, and convergent cones can be a little more tricky, although still quite easy. Its pretty basic. If you have a high end motor that produces alot of power, for the best overall performance, you will probably want to use the heavier convergent cone (the one with the red tip), and a heavier spring. The more rings you use inside the exhaust, the punchier your throttle response is, at the expense of top end performance, and vice-versa. What do I recommend? Experiment. Have fun with it. There are a lot of combinations to try with the exhaust, and each one will give you different results.

My Personal Experiences:

The moment I fired up my Savage X 4.6 with the buku installed, it was a true thing of beauty. The exhaust has a different sound than most others at first, it was mean, and sounded ready to go. I ran a couple laps up and down my street to get my motor warm, and then brought it in for its first HSN tune. This was the first and only tune I did at 1/8th a turn, considering it was so rich. I gave it a little gas to clear out its throat, and punched the throttle. The gain in top-end performance was already noticeable, and I was happy. At this point, the top end was about the same as before the exhaust was installed, which means now while my savage was running fat as a pig, I was getting the same top-end results as I had been getting before when it was tuned perfectly. After a few more 1/10th and 1/12th turns of the HSN, my truck was a whole new beast. Even with not having touched the LSN, it accellerated decently, and the top-end speed was completely insane. It was so insane that at full speed, it was hard to steer because my tires were barely touching the ground. I estimated a good 10-15mph gain in top-end speeds. Then came the low end tuning. This is when my whole truck woke up. The first turn was 1/8th of a full turn, which was almost enough. The truck was VERY fast at this point, even with the tuning plug in, it was roaring off the line, and the top end was still amazing. I removed the tuning plug, and things got crazy! I hit the gas, and my Savage instantly flipped onto its lid. This is when I grew a huge grin all across my face. So, with the conclusion after tuning the truck and removing the tuning plug that I had to re-learn to drive my Savage, I was happy! You can't beat the power that this exhaust produces.

CONCLUSION:

Overall, I am very pleased with the entire performance and diversity of the Buku exhaust system. After using it for almost two months now, it has held up great, stayed consistent, and the tuning factor makes my truck able to adapt to almost any condition and any area. I love this exhaust dearly, and will never go back to any other exhausts on my vehicles again. It is a true innovation, and we should all give Dave a big round of applause for making such a great product.

Sunday, May 24, 2009

The inside loop is the easiest of all stunts to pull off, and any rc airplane with elevators is capable of looping.

The inside loop rc aerobatic maneuver

How to do it: Start by flying straight and level into wind.
Open the throttle to full power and, at point A in the picture above, pull back on the elevator stick to start a climb - not too suddenly, be gentle but definite. Keep the power on. The airplane will go into a vertical climb, let it keep going until it starts to roll over onto its back - point B in the picture. At this point, close the throttle and keep holding the elevator stick back, adjusting it as necessary to maintain a tidy path.
At point C in the picture, level out the airplane by returning elevator to neutral and increase power to exit the loop, flying straight and level again.


quality='high'
pluginspage='http://www.macromedia.com/go/getflashplayer'
type='application/x-shockwave-flash'
allowScriptAccess='always'
width='410'
height='352'>

Tuesday, May 19, 2009

RC COPTERS TO AID IN NATURAL DISASTERS


Natural or artificial disasters can strike at any time, in any region of the globe, and can also cause massive amounts of devastation at ground zero, and in surrounding areas. In the first moments after the catastrophe, emergency response teams need to devise the best course of action, while under extreme stress, and experiencing the need to act as soon as possible. But, given a rushed decision, the whole rescue operation could turn into a fiasco. That's why experts at the Fraunhofer-Gesellschaft Institute (IITB), in Germany, have created a new damage-assessing tool, especially for this type of circumstances. They've designed and constructed a prototype of a small, remote-controlled helicopter, which can be equipped with video cameras and other types of sensors, and can be flown over the affected areas, in search for survivors. Using data gathered from these machines, emergency response teams could elaborate the best course of action, according to the realities in the field. The “quadrocopter” can be flown either separately, or in swarms, which can provide 360-degree fields-of-view of the objective.Due to the fact that the machine is only one meter (about three feet) in diameter, it can be flown inside collapsed buildings, and can steer clear of obstacles, as the operators guide themselves with images received from on-board cameras. The German researchers have big plans for their innovation. They want to create swarms that can fly themselves, or that can be flown by just a single emergency worker. That is to say, current versions of the quadrocopter need to be flown individually, which makes deploying large numbers of them both expensive and impractical.Dr. Axel Bürkle, who is the project manager at the IITB, says that the team has also developed a piece of computersoftware to control larger numbers of the small, RC helicopters. “Our program enables the quadrocopters to coordinate their activities themselves. One of them can fly up close to victims to investigate their injuries while another reconnoiters the fastest route for getting them out,” the expert points out. He adds that the software is made of individual sections, or “agents,” which can be assigned to one of the quadrocopters.Each of the agents is controlled by the software in a digital environment, and is given a specific task, such as the fly-by, close-up investigation, general surveillance, and so on. Upon receiving the commands, each of the agents executes them, but also steers clear of all other helicopters, so as to avoid the risk of collisions. The powerful relays on the quadrocopters allows them to beam back sounds, videos and images to control posts, which can then be analyzed by human experts, and acted upon.

Saturday, May 9, 2009

SC10 TEAM ASSOCIATED READY TO RUN RC TRUCK


Team Associated have announced that their SC10, 1/10 scale electric 2WD off road authentic short course race-truck is now available as a ready-to-run. The SC10 comes ready-to-run with a factory finished short course race-truck body, short course style wheels and aggressive tread multi-terrain tires, all which have been designed to look just like the full-size race trucks that run in short course off-road series around the country. It is fitted with the XP2 radio system and metal gear steering servo as well as the XP SC200 digital electronic forward/reverse speed controller with optional LiPo low voltage cutoff and optional reverse lockout.

Tuesday, April 28, 2009

RC KITS

RC Car Kits, With You In Mind

A great guide to remote control car kits is every rc hobbyist’s dream! There are a range of rc car kits and rc package deals in the market. Finding out which one suits your needs is of importance. Select picks of remoteremote control car kits control kits include the electric RC Ferrari FXX - TT01 from Tamiya America, Inc which is used for on road racing. Another electric rc car kit from Tamiya and used for drifting is the RC Subaru Impreza Drift with 4wd. Other 2wheel drive kit from Tamiya America, Inc is the RC Porsche 911 Carrera and RC Suzuki Swift Super. Tamiya America, Inc also produces the 1/14 TT Ferrari 643. The fastest remote control car in the world is an assembled L3 Oval racer from Team Associated RC cars with speeds over 100mph.

Wednesday, April 22, 2009

RC CRAZE!!! GRAB A REMOTE!!!!

RC cars, RC buggies and RC truck bodies come in all shapes, sizes and brands from Lamborghini all the way to Mustang. RC cars, monster trucks and other radio controlled vehicles can be found in virtually every neighborhood, so beware when the little counterparts cross in front of your car.

For a great deal on used rc cars, discount rc cars and other rc cars for sale, they always have virtually every rc cars and trucks imaginable.

Before you invest in your new found hobby, I highly recommend that you hop on over to youtube.com and watch some rc car videos on the specific rc car, rc truck or rc buggy you may be thinking about investing in.

Although electric rc cars seem to be a bit more popular and easier to work on, there is a lot to be said for the sound and raw power of a gas powered rc car.

Check with your local hobby store as most seem to have some sort of live rc racing setup on a weekly basis.

If you are looking for a great father/son hobby, radio controlled toys are it. Start out with a micro rc car, see how the little guy likes it and then move on up to the more advanced rc model cars, rc monster trucks or more sophisticated radio controlled cars.

Wednesday, April 15, 2009

Balance Your Radio-Controlled Helicopter

Learn to Balance Your Radio-Controlled Helicopter

Step1

Read every page of the instruction manual that accompanied your RC helicopter kit when you bought it. You will need to have a good working knowledge of your RC copter's moving parts in order to master the difficult task of finding balance while hovering.

Step2

Familiarize yourself with the radio control unit for your helicopter before you head out into the field. Consult your instruction manual if you need further explanation on the exact functions of the controls included.

Step3

Put your RC helicopter on the ground (grass, ideally, in case you crash) about 5 to 7 feet in front of you. Make sure the nose is pointing away from you, and the helicopter's tail is nearest you.
Step4
Use the radio control unit to bring the helicopter 'up to speed,' meaning to get its blades rotating fast enough for lift-off while maintaining ground stability. Note that this step itself may require considerable practice to perform properly.

Step5

Use the throttle on your radio control to give the RC copter the extra kick it needs to become airborne. Pull back on the amount of throttle you're applying once the copter is about 1 foot off the ground, giving it just enough juice to stay in the air. Make every effort to keep it in the same spot. This will be difficult, especially for beginners.

Step6

Release the throttle (also sometimes called the 'collective') so the helicopter returns to the ground. Make a note of what you did right and where things went wrong.

Step7

Keep trying. Flying an RC helicopter is not easy, and newcomers can become discouraged very quickly. The more you practice, the easier it will get.

Friday, April 10, 2009

RADIO CONTROLLED HELICOPTER

  • Take your R/C hobby to new heights with the Syma HX603 radio controlled helicopter.
  • This life like helicopter is powered by two electric motors and can fly up to 100 feet high at speeds up to 12 mph.
  • Soft, gradual control response and stable hovering characteristics also make it one of the easiest R/C helicopters to fly!
  • The fully functional remote features left, right and up, down controls and allow hovering at any altitude.
  • The main frame and body of this durable helicopter are constructed using ABS crash resistant plastic.
  • Features:
    • Twin electric motors
    • Altitude and rotor speed control
    • Flight stabilizing system
    • Super lightweight airframe
    • Brake for easy landing
    • Charges in just minutes
    • Realistic looks
    • Long flight times
    • Ready to fly
    • Motor type: 370
    • Dimensions: 21.5 in. L x 6.5 in. H x 3.5 in. W
    • Main blades diameter: 19.5 inches
      Tail rotor diameter: 5.75 inches
    • Colors may vary
  • Includes:
    • Radio control transmitter
    • AC charger
    • Manual
    1. Nimh rechargeable battery


Tuesday, March 31, 2009

THE BEGGINER RC HELICOPTER PILOT

If you are considering the sport of radio controlled helicopters, the first thing you must remember is cost. This is a fun and adventurous sport, but it is not cheap. Crashes will happen and repairs will have to be made at an expense. So please keep that in mind. So until you can pilot AIRWOLF (remember that television show) you have to be dedicated, patience and committed to the sport Do not think you are going to go out and buy a radio controlled helicopter, crash it, fix it in one day, and then hit the sky like an expert the next day.

SAFETY IS AS SAFETY DOES! Translation flying a radio controlled helicopter is safe only if you are safe.

The rotating main blades of the helicopter, and the blade tip spins at 200-1500 rpm, with a blade radius of about 1 meter. It will easily cut thru skin and bones.

Never fly a model helicopter until you are able to control the helicopter.always fly in open space, and in the event that you loose control, no one, including yourself, will be in the way of a runaway helicopter.

Register your radio with your local telecommunication authorities, and get some form of insurance coverage if your model were to hit other people's property or life.

All these small precautions will put your mind at ease and you can then fully enjoy the trill of learning, building, and flying the most sophisticated radio control model every designed - The RC Model Helicopter!

HAVE FUN !!!!